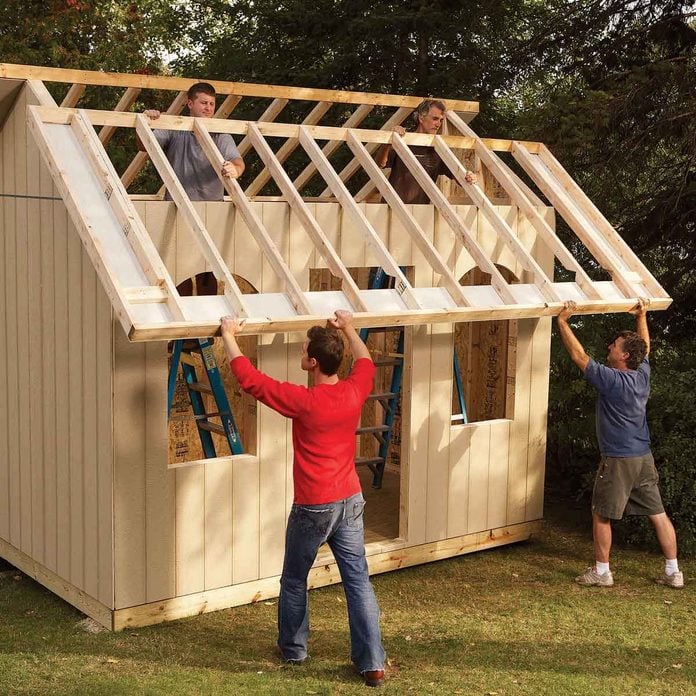
Alright, folks, you're tired of your garden tools cluttering your garage, right? Maybe you crave a dedicated space for your potting bench, or maybe you just want a cozy spot to escape with a good book and a cup of coffee. Whatever your reason, a 10x12 garden shed is the perfect solution! And the best part? You can build it yourself!
Don't worry, you don't need to be a seasoned carpenter to tackle this project. I'm going to break it down step-by-step, making it easy for even the most novice DIYer to build their dream shed.
Before We Get Started: The Planning Stage
Think of this as the foundation of your project, literally! Before you grab your tools and head to the lumberyard, take a few moments to consider these crucial elements:
Location, Location, Location: Where in your yard does the shed make the most sense? Consider access, sunlight, drainage, and any existing features like trees or fences.
Building Codes: Check with your local building department to ensure your shed meets local regulations. You'll need to secure building permits in some areas.
Foundation Type: Choose a foundation that's suitable for your soil conditions and shed size. A concrete slab, gravel pad, or even treated lumber piers are good options.
The Shed's Purpose: What will you be using the shed for? This will determine the interior layout and the size of your door and windows.
Design and Materials: Decide on the style of your shed, from simple to more elaborate. Think about roof pitch, siding, and windows.
Budget: Set a realistic budget for your shed, including materials, tools, and any potential labor costs.
Time to Get Your Hands Dirty: The Foundation
Okay, now it's time to start building! The foundation is the most important part of your shed, so make sure it's solid.
Prepare the Ground: Clear the area of debris and vegetation, and level the ground where your shed will be located.
Foundation Construction: Follow the instructions for your chosen foundation type. For a concrete slab, you'll need to pour and level the concrete. A gravel pad involves laying a compacted layer of gravel. Treated lumber piers require digging holes and setting posts in concrete.
Allow Curing Time: If you're using concrete, let it cure for at least 24 hours before proceeding.
Let's Build Some Walls:
With the foundation ready, it's time to create the framework of your shed. This is where your woodworking skills come into play!
Framing Materials: Choose treated lumber for your floor joists and sill plates, as they will be in contact with the ground. Use standard lumber for your wall studs and roof rafters.
Floor Construction: Cut and lay the floor joists on the foundation, ensuring they are spaced according to your building plans.
Sill Plates: Install the sill plates around the perimeter of your floor joists. These will act as the base for your walls.
Wall Framing: Stand your wall studs upright, attaching them to the sill plate and top plate. Make sure the studs are plumb and spaced according to your building plans.
Roof Rafters: Cut and install your roof rafters, attaching them to the top plate of your walls. Ensure they are spaced correctly and have adequate support.
Now Let's Add Some Style: Siding and Roofing
Time to turn those walls into a charming shed!
Sheathing: Install sheathing over the wall framing to provide a smooth surface for siding and to add structural rigidity.
Siding: Choose your desired siding type, from traditional wood to modern composite materials. Follow the manufacturer's instructions for installation.
Roofing: Lay down a layer of roofing felt over the rafters, then install your chosen roofing material. Asphalt shingles, metal roofing, or even cedar shakes are common options.
Windows and Doors: Cut openings for your windows and doors, ensuring they are properly framed and secured.
Finishing Touches: The Inside and Out
The shed is starting to look like a home! Now let's complete the details.
Interior Finish: Install drywall, paneling, or another interior finish of your choice.
Electrical Wiring: If you plan on adding lights or outlets, run electrical wiring according to local codes.
Painting and Staining: Paint or stain your shed's exterior and interior to protect it from the elements and add some personal flair.
Insulation: Consider adding insulation to the walls and roof for better temperature control and comfort.
Congratulations! You Built a Shed!
You did it! You built your own 10x12 garden shed, a testament to your DIY skills and determination. Now, celebrate your accomplishment with a well-deserved break and a moment to admire your handiwork.
Important Reminders:
Safety First: Always wear safety gear like gloves, goggles, and hearing protection. Use caution when working with power tools.
Building Codes: Double-check your local building codes throughout the project.
Professional Help: Don't be afraid to ask for help if needed. Local lumberyards and hardware stores can provide advice and guidance.
Have fun and enjoy your new garden shed!
Another Post you may like:
No responses yet for "Step-by-step guide for diy 10x12 garden shed construction"
Post a Comment
Note: only a member of this blog may post a comment.